Monday, August 24, 2009

Multi PIC & EEPROM Programmer


This JDM programmer can support PIC12, 16, & 18 family ucontrollers and some 24c EEPROMS. It also provides in circuit serial programming, ICSP.


click on image to zoom


T1- T2, BC337 Transistor
D1, D4, D5, D6 , 1N4148 Diode
D3 , 6V2 Zener Diode
D2 , 5V1 Zener Diode
R3- R4, 1K8 1/4W Resistor
R1 , 10K 1/4W Resistor
R2 , 1K5 1/4W Resistor
X1 , DB9 PCB Mount Female Connector
C1, C2 , 100uF 16V Electrolytic Capacitor
SV1 and SV4, 40 Pin Machine Tooled IC Socket
SV2, SV3, 20 Pin Machine Tooled IC Socket
SV5 (ICSP); 6 Pin Header Connector9
L1, L2, L3, LED (L1: GREEN, L2: RED, L3: YELLOW)

Saturday, August 22, 2009

PIC16F84a Chaser


This is an other kind of a LED Chaser in which the 'PIC16F84A' microcontroller, IC1, is used. The program that runs on this chip controls the LEDs attached to the output port pins. Resistors R1 - R8 limit the current through LED1 - LED8 to a safe level. Resistors R9-R13 provides a pull-up for the input connected to switches S1-S5. 4 MHz crystal is used for clock pulse generator & capacitors are used to ground the unwanted pulses.


click on image to zoom


Note that VCC should not exceed 5v.
  • Resistors, R1 - R8 220 ohm 0.25W
  • Resistors, R9 - R13 10k ohm 0.25W
  • IC1 PIC61F84A
  • Socket for IC1
  • Red LEDs (8)
  • S1 - S5, Push Switches
  • Ceramic Capacitors,C1-C2 27pF
  • 4 MHz Crystal


Hex code:
Note: Just copy the below code and paste it in notepad and save it with '.hex' extension, as chaser.hex.

:020000000528D1
:0800080005288316FF30850076
:1000100086018312FF308600051C1720851C3320C3
:10002000051D4F20851D6820051E96200C28FE30DA
:100030008600C020FD308600C020FB308600C02036
:10004000F7308600C020EF308600C020DF30860009
:10005000C020BF308600C0207F308600C020FF3027
:100060008600C02008007F308600C020BF30860098
:10007000C020DF308600C020EF308600C020F7307F
:100080008600C020FB308600C020FD308600C020E6
:10009000FE308600C020FF308600C02008007E3081
:1000A0008600C020BD308600C020DB308600C02026
:1000B000E7308600C020DB308600C020BD308600DF
:1000C000C0207E308600C020FF308600C02008009F
:1000D000FE308600C020FD308600C020FA30860049
:1000E000C020F5308600C020EA308600C020D53020
:1000F0008600C020AA308600C02055308600C0206F
:10010000AB308600C02057308600C020AF3086005C
:10011000C0205F308600C020BF308600C0207F3006
:100120008600C020FF308600C02008000030860016
:10013000CC20FF308600CC2000308600CC20FF3061
:100140008600CC2000308600CC20FF308600CC20FA
:1001500000308600CC20FF308600CC2000308600A6
:10016000CC20FF308600CC20080002308D00F93012
:100170008C00000000008C0BB9288D0BB7280800FC
:1001800064308E00B5208E0BC228080005308F0029
:10019000C0208F0BC828080002309000C620900BAA
:0401A000CE2808005D
:02400E00F23F7F
:00000001FF


Now burn the ucontroller using JDM Programmer. For more details read my article "Getting Started with ucontroller".

In Eagle 3D LED Chaser looks like:

Wednesday, August 19, 2009

PIC16F628a Led Chaser

The heart of the LED chaser is the 'PIC16F628A' microcontroller, IC2. The program that runs on this chip controls the LEDs attached to the output port pins. Resistors R1 - R8 limit the current through LED1 - LED8 to a safe level. Resistor R9 provides a pull-up for the input connected to switch S1.


click on image to zoom

  • Resistors, R1 - R8 330 ohm 0.25W
  • Resistors, R9 - R10 10k ohm 0.25W
  • IC2 PIC61F628A
  • Socket for IC2
  • Red LEDs (8)
  • S1 Push Switch


  • Capacitor, C2 100nF 5v Dielectric Ceramic
  • Capacitor, C3 220nF 5v Dielectric Ceramic
  • Jp2 Single row PCB header plug
  • IC1 LM7805 5v voltage regulator

Hex code:
Note: Just copy the below code and paste it in notepad and save it with '.hex' extension, as chaser.hex.


:020000040000FA
:02000000B52821
:08000800BB00030EBC000A0856
:10001000BD00831264009D3081070B11E220B50BF7
:1000200017283230B500B715AA03031937143D0855
:100030008A003C0E8300BB0E3B0E09003520B71D25
:100040001E28B711051E2C28360A03192A28FC3E43
:100050000318B714B6011E28360A03191E28B60065
:10006000803A06300319A0001E288A012008820762
:100070004028532861286928742885289128B128A8
:10008000A00A30083F213713B7132F21B8184C2886
:100090002B1BB717192108002B1F08006821031C10
:1000A000371719210800B71C5928B7100330A000D2
:1000B0000800371C08002B081F39031D1929A00A46
:1000C0000800A00A381D08002F2119210130A000C6
:1000D0000800A00AB8180800B71F08002F21B7139E
:1000E00037170130A0000800A001B8187D28B00A19
:1000F00030082F060319B001080068212C05B00054
:100100002F08300203187D280800A8013808A7002E
:10011000B71C0800B71003100130381D380DB800A7
:1001200008000730371D0530A000B7100430B706AF
:10013000FF30B600B81D08008B120B118B13640042
:10014000810183160F30810083128601B60163009E
:100150006400051AA628B60A3608023A031DA72825
:10016000B528A801A701A0010800860107309F005B
:100170008316103085008601003081008312203004
:1001800084003D308001840A0406031DC1289D308F
:1001900081003230B500FF303F212F03BB00AC019E
:1001A0000830BB0DAC08031D0314AC0DFF3E031D4E
:1001B000D128B0011F30A9000130B8000B118B16F7
:1001C0008B171E2822082305240525052605A104D2
:1001D000210886002508240523052205A6062408F3
:1001E00023052205A50623082205A4062208A30646
:1001F000A209A90B08001F30A900A1012808A2002C
:100200002708A5002805A300A400A6000800B20046
:10021000B20DB30CB20DB30CB20DB30CB20DB30CE6
:10022000B20DB30CB20DB30CB20DB30CB20D330C56
:1002300008003821AA003710013E03192A29382165
:10024000371B0721B4003821371B0721A7003408CA
:10025000A800080033213821AB03371408003321EC
:100260003821AB0008002E08BA002D08B90008009C
:100270003A088A003908B90A0319BA0A8200B0009C
:100280005C21B00803190800AE00B1016121013EF4
:1002900003195A29033003190230AD070318AE0AB7
:1002A0006121013E031D4C29310AB1003006031DB6
:1002B000462908003108AF007630AD000130AE00AD
:1002C00008002E088A002D08AD0A0319AE0A820024
:1002D0003E083F040319BF090310BE0DBF0D031CE8
:1002E0007429A130BE06BF063F0808000534083453
:1002F0008134003408344234003408342434003467
:1003000008341834003408349934003408345A342A
:10031000003408343C3400340834003418340834D1
:100320000034183408348134183408344234183412
:100330000834243418340834183418340834993400
:10034000183408345A34183408343C341834083417
:100350001834183408343C343C3407347E347E344A
:100360000634FF34FF340834E734FF340A34DB3416
:10037000E7340A34A534C3340A34423481340C34AB
:1003800081340034FF3448340534E03440340534DB
:100390007034203405343834103405341C340834B7
:1003A00005340E3404340534073402340534833400
:1003B00001340534C1344034FF3448340334E0346C
:1003C000403403347034203403343834103403346C
:1003D0001C34083403340E34043403340734023438
:1003E0000334833401340334C1344034FF3448349B
:1003F00002348034803402344034403402342034B7
:1004000020340234103410340234083408340234F6
:10041000043404340234023402340234013401342A
:1004200002348034803402344034C0340234A03486
:1004300060340234503430340534283418340734EE
:1004400014340C3409340A3406340B3405340334C0
:100450000C34023401340E3401340034FF3443349C
:100460000134803480340134403440340134203449
:100470002034013410341034013408340834013489
:1004800004340434013402340234013401340134BC
:1004900003340234033404340534063405340B3495
:1004A0000C3406341734183407342E3430340834FE
:1004B0005C3460340934B834C0340A346034803475
:1004C0000B34803400340C3400340034FF344834AE
:1004D00008348234813408344134C0340834A034C0
:1004E0006034083450343034083428341834083434
:1004F00014340C3408340A34063408340534033414
:10050000FF340A34083466340034083499346634CD
:1005100008346634FF3408349934FF3408346634C0
:100520009934083499340034FF340E34073481345C
:1005300000340734413482340734A534C3340734DB
:100540005A34E7340734A5347E3407345A343C3403
:100550000734243418340734183400340734003492
:100560000034FF340A3408340034CC340834003406
:100570006634083400343334083400349934FF349A
:1005800044346434FF34003414347F3480341434FD
:10059000FF3480340234FF3440340234FF342034DA
:1005A0000234FF3410340234FF3408340234FF3490
:1005B00004340234FF3402340234FF340134023490
:1005C000FF3400340234FF3480340234FF344034CA
:1005D0000234FF3420340234FF3410340234FF3448
:1005E00008340234FF3404340234FF340234023459
:1005F000FF340134FF3404340734DB343C34073433
:10060000B734783407346F34F0340734DF3460346F
:1006100007346F34F0340734B73478340734ED34AA
:100620001E340734F6340F340734FB3407340734F0
:10063000F6340F340734ED341E34FF3404340734F9
:10064000FF34803407347F34C0340734BF3460341F
:100650000734DF3430340734EF3418340734F734D8
:100660000C340734FB3406340734FD3403340734C8
:10067000FF3401340734FE3403340734FD340634C8
:100680000734FB340C340734F73418340734EF34B0
:1006900030340734DF3460340734BF34C034FF34BF
:1006A00006340734813400340734423400340734CC
:1006B00024340034073418340034073499340034B7
:1006C00007345A34003407343C34003407340034DF
:1006D000183407348134183407344234183407345A
:1006E00024341834093418341834093400341834D4
:1006F00009341834003409340034183409341834F7
:100700001834033424343C3404345A346634053405
:10071000A534C33406344234813407348134003480
:10072000073400340034FF345F34073488348834AD
:100730000734443444340734223422340734113427
:100740001134FF345F340734AA34CC3407345534C1
:1007500066340734AA343334073455349934FF34BB
:1007600009340934A534C3340934DB34E73409349B
:10077000E734FF340934FF34FF3409347E34FF3466
:100780000934BD347E3409345A343C3409342434B9
:100790001834093418340034093400340034FF3478
:1007A0004C340634A234C13406345134E0340634B7
:1007B000A834703406345434383406342A341C34A3
:1007C000063415340E3406348A340734063445347E
:1007D0008334FF34443406348034003406344034E7
:1007E0000034063420340034063410340034063427
:1007F000083400340634043400340634023400343F
:100800000634003401340634803401340634403474
:1008100001340634203401340634103401340634F3
:10082000083401340634043401340634003403340B
:100830000634803403340634403403340634203420
:1008400003340634103403340634083403340634D5
:100850000034073406348034073406344034073417
:100860000634203407340634103407340634003498
:100870000F34063480340F34063440340F340634D9
:1008800020340F34063400341F34063480341F34CF
:10089000063440341F34063400343F340634803488
:1008A0003F34063400347F3406340034FF340634D9
:0E08B000FF34FF34013400340034FF34FF34D1
:02400E00743FFD
:00000001FF


Now burn the ucontroller using JDM Programmer. For more details read my article "Getting Started with ucontroller".


Tuesday, August 18, 2009

Getting Started with Microcontrollers

A microcontroller is an integrated chip. They contains a CPU, RAM, ROM, I/O ports, and timers like a standard computer, but because they are designed to execute only a single specific task to control a single system, they are much smaller and simplified so that they can include all the functions required on a single chip. Note that there are lots of verities of µcontrollers and in this article my emphasis is on ‘PIC µcontroller.
A microcontroller differs from a microprocessor, which is a general-purpose chip that is used to create a multi-function computer or device and requires multiple chips to handle various tasks. A microcontroller is meant to be more self-contained and independent, and functions as a tiny, dedicated computer.
Microcontrollers need software to perform specific tasks. So, you need a ‘Programmer’, it is the hardware needed to put the software inside the µcontroller. Programming the µcontroller is also known as "burning" the µcontroller.
This is a simple and easy-to-build PIC JDM programmer. It works using the power from the RS-232 Serial port. The serial cable should not be longer than 3 feet.
click on image to zoom
Then you need the ‘Software’ to use with the computer and transfer the code to the PIC. Let’s start with the serial port.

Below figure shows the pin assignments for the four DB-9 serial RS-232 port connectors. These connectors are used to connect serial devices such as modems.


At now this information is enough for the beginner. Now move towards the JDM Programmer.

This name comes from the name of ‘Jens Dyekjar Madsen’ who devised this first. There are lots of JDM Programmers available but the above programmer is for only PIC16X628a and PIC16X84a µcontrollers.

In the schematic the capacitor is of 100µF/16v value. And zener diode is of 5.1v. The R2 (3K3) resistor and LED is optional, you may omit these. Make sure about the right connection of Programmer and the DB-9 serial RS-232 computer port.

After doing these things you need software to ‘burn’ the µcontrollers. I do recommend ‘PICPgm Programmer’ and ‘Pony Prog, as they are easy to use and free to download.

PICPgm Programmer Automatically detects the Programmer and µcontrollers, no settings is required. Just connect your programmer to serial port, browse the 'hex' file code and click on ‘Programm PIC’ icon.


Where as in Pony Prong first click on ‘Setup’ and then select ‘Interface Setup’.

A new window will open; select ‘serial’ and ‘JDM API’ from drop down list. Also check on that ‘COM’ option on which your programmer is connected, in my case it is ‘COM1’.


After this again click in ‘Setup’ and select ‘Calibration’. A message window will appear, just click ‘yes’.


Now select you µcontroller from drop down list.


Another important detail when using and programming microcontrollers is the configuration word or also known as ‘FUSES’.

A fuse indicates the configuration for the PIC regarding the timers, watchdog, code protection and oscillator.

For fuse settings click on ‘Command’ and then select ‘Security and Configuration bit’.
A new window will appear with a lot of check boxes.
Do not panic, normally the hex code contains these configuration. If it is not so, then check in the ‘asm’ file for these settings and you will find something like this:
__CONFIG _CP_OFF & _WDT_ON & _PWRTE_ON & _INTRC_OSC_NOCLKOUT & _LVP_OFF

Configure it according to your asm file. Some explanation is given below:
  • CP: if checked all memory is code protected
  • PWRTE: if checked power-up timer is enabled
  • WDTE: if checked watchdog timer is disabled
  • FOSC1,FOSC0: oscillator selection bits
FOSC1
FOSC0
Status
not checked
not checked
RC resistor/capacitor oscillator
not checked
checked
HS high speed crystal/resonator oscillator
checked
not checked
XT crystal/resonator oscillator
checked
checked
LP low power oscillator


After this browse your hex code from ‘file’ menu then from ‘Command’ menu select ‘Write All’. A status window will open and show you the writing progress.

That is it. Enjoy playing with µcontrollers.

Sunday, August 16, 2009

Make your own PCBs layout using Eagle Layout Editor


In this article we will discuss how can you make PCBs using Eagle Layout Editor 5.6 Freeware (PCB design).

First of all Open Eagle, under Projects right click and then left click to New Project. Give a name to the new Project, for exampleexample’ and then click Enter. Right click the example, you created, and select New and then board.


We will design a simple led chaser using PIC16F84a micro-controller. Add the component needed for this circuit by clicking on ‘ADD’ icon from tool panel in left.


After arranging the components we get the figure like this:


You can also assign the name to the component by selecting ‘name’ icon and then chose the component which is to be named.


Now select the ‘wire’ icon, and the color for wire (normally I chose red).


After tracing select the ‘polygon’ icon and draw a polygon (across the whole circuit), after doing this click on ‘Ratsnest’ and you will get this:


Now give the name to the polygon (for example Vcc,Vss etc) according to your signals, In my case I assign ‘GND’. Remember; also assign the same name to your signal (wire), so that the polygon and signal merge together.
After this, click on the ‘info’ icon and then on polygon to change the polygon settings.


After applying changing in ‘spacing’ and ‘isolation’ of the polygon select the Display button from the tools bar and "Del" the all selections except the selected ones:


Then click File –> Export and select Image’.
This image will show up:
Change the resolution to 600 and check the monochrome box.
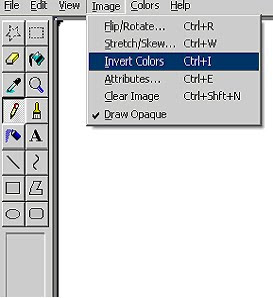
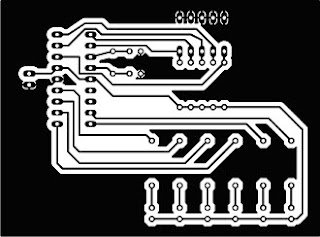
Click browse button, give name and save the image as bmp format. Open the image in mspaint select the ‘image’ option and click on ‘invert colors’.
The result is like this:
You can also mirror the image by using the same ‘image’ option. Just click on ’flip/rotate’ option and select ‘flip horizontal’. Now your PCB is ready for printing.